I'm fussy when it comes to pizza. I need a thin crust and good quality toppings, thick doughy bases and too much pizza sauce with a smattering of bad quality mozzarella are not to my liking. We need a good pizza place here ASAP, Loughborough is home to far too many lame take-out dives serving foam based doner kebab topped abominations. But we shall leave such disgusting thoughts behind us and move on to the good stuff...
I find vegetarian toppings much more to my liking on pizzas, lots of light elements rather than strong spicy meats so you can taste each ingredient as well as a light well thrown base. Don't worry, I'm not asking you to throw your pizza bases for this recipe, I'm pretty sure if I had tried we would have ended up with a cat running around the flat in a ghost-like costume made of dough. Never a good thing.
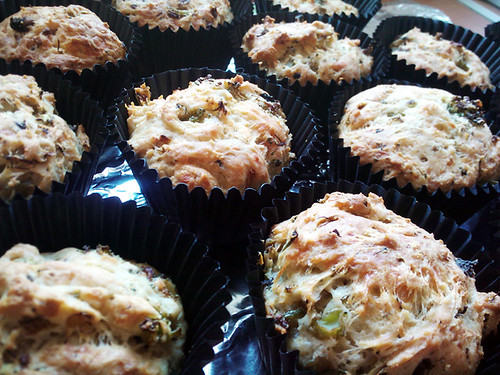
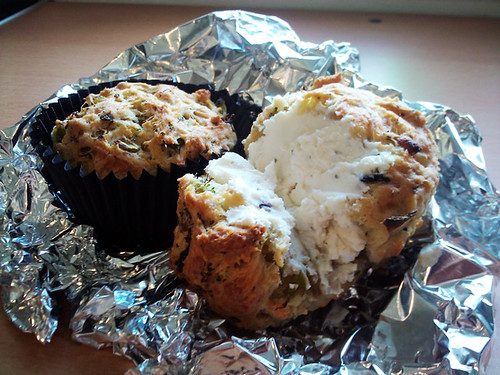
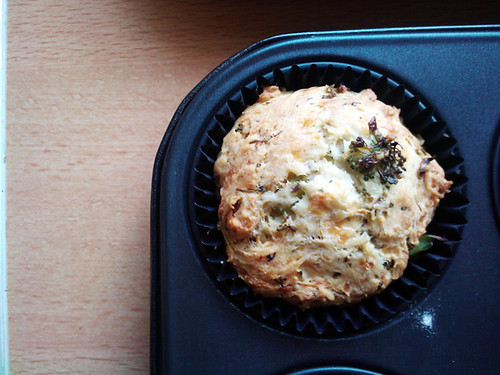
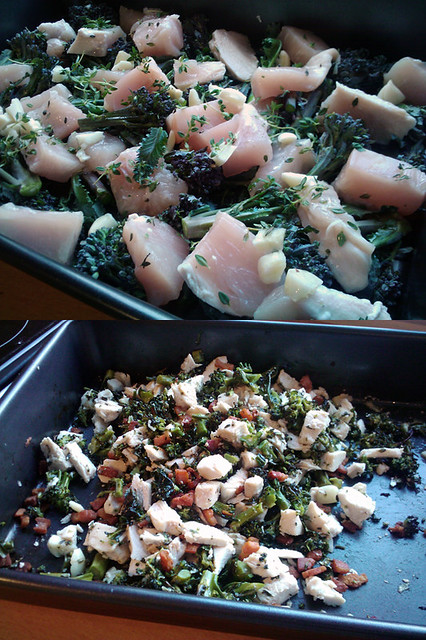
What is a good thing however, is the whole premise of a pasty style pizza. A crisp outer shell with a softer inner edge that gives way to a generous pile of cheesy tomatoey goodness. In this recipe I have used chicken and broccoli, purple stemmed broccoli to be exact - lots of subtle flavours that you make sing with a wonderful herb combination of lemon thyme and oregano. Roasting the chicken and broccoli is also a great flavour intensifier and removes the extra moisture which would produce the awful result of a soggy calzone.
You will get either two very large or four medium calzones from this recipe. Pete and I shared one large calzone and I would suggest serving it with a sharply lemon and oil dressed salad and a smile.
I find vegetarian toppings much more to my liking on pizzas, lots of light elements rather than strong spicy meats so you can taste each ingredient as well as a light well thrown base. Don't worry, I'm not asking you to throw your pizza bases for this recipe, I'm pretty sure if I had tried we would have ended up with a cat running around the flat in a ghost-like costume made of dough. Never a good thing.
What is a good thing however, is the whole premise of a pasty style pizza. A crisp outer shell with a softer inner edge that gives way to a generous pile of cheesy tomatoey goodness. In this recipe I have used chicken and broccoli, purple stemmed broccoli to be exact - lots of subtle flavours that you make sing with a wonderful herb combination of lemon thyme and oregano. Roasting the chicken and broccoli is also a great flavour intensifier and removes the extra moisture which would produce the awful result of a soggy calzone.
You will get either two very large or four medium calzones from this recipe. Pete and I shared one large calzone and I would suggest serving it with a sharply lemon and oil dressed salad and a smile.
Garlic and Lemon Thyme Roasted Chicken and Purple Sprouting Broccoli Calzone
Serves 4
Pizza Dough Ingredients
325ml water, luke warm
2 tbsp olive oil
1/2 tbsp caster sugar, preferably golden
1 x 7g sachet of dried yeast
500g strong white bread flour, plus extra for dusting
1/2 tsp salt, finely ground
Creamy Ricotta Pizza Sauce Ingredients
1 tbsp olive oil
2 medium red onions, diced small
2 tsp dried oregano
6 medium-large vine ripened tomatoes, diced small
200g ricotta cheese (one standard size pot)
Filling Ingredients
170g pancetta, diced very small
2 tbsp olive oil
200g purple sprouting broccoli, cut into 1-2 inch pieces
500g chicken breast, cut into 1.5 inch chunks
4 cloves of garlic, roughly chopped
3 tbsp lemon thyme leaves, freshly pulled from the sprigs
3 tbsp parmesan, finely grated
300g mozzarella, grated
Pizza Dough Method
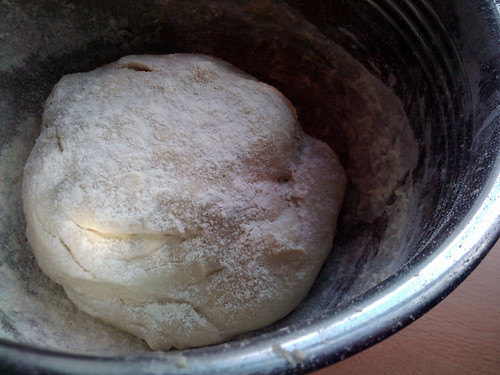
In a jug or bowl mix the water, olive oil, sugar and yeast well and set to one side for a few minutes to 'come alive' while you place the sifted flour into a bowl and make a well in the centre. Pour the yeasty mixture into the well and stir together with a fork gradually incorporating the flour. When it starts to come together place the dough onto a clean and floured surface and knead it until you have a springy, smooth dough - this should only take a minute or so. Place this into a floured bowl, sprinkle the top of the dough ball with more flour and cover with a damp clean tea towel. Set this aside in a warmish place to rise for about an hour, it will pretty much double in size.
Pizza Sauce Method
Preheat the oven to 200 C / 400 F.
Heat the olive oil in a deep non stick pan and add the diced onions. Cook for 2-3 minutes and then sprinkle over the dried oregano. Cook for another 2-3 minutes, add the diced tomatoes and stir well. Cook on medium high heat for about 10 minutes until the tomatoes have melted down into mush and you have a fairly thick sauce. Turn off the heat and leave to cool for 5 minutes before mixing in the ricotta cheese. Leave this off the heat to cool while you roast your fillings.
Filling Method
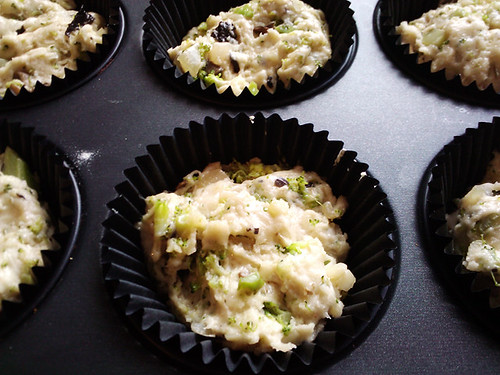
Place all the ingredients into a roasting tray and mix around so everything is coated with the oil, then cook in the preheated oven for 20 minutes, stirring halfway through the cooking time.
Remove from the oven and leave to cool for ten minutes. Pour onto a chopping board and dice everything down into roughly 1cm chunks, cover and leave to cool completely.
Building The Calzone
Remove your risen dough from it's bowl and knead again on a clean floured surface. Give it some welly and punch it about a bit this time to get the elasticity going, then cut into either two or four chunks depending on how many calzone you are making.
Roll the chunks of dough out into rough circles that are about half a cm thick. Place one onto a baking sheet and slather it with a good layer of the creamy tomato sauce. Sprinkle over some of the parmesan and then pile up some of your filling covering only one half of the base. Cover that with a good layer of grated mozzarella and then fold the non-topped side over the top of the fillings and press down around the edges to seal it closed.
Repeat until you have all your calzones made and then bake in the still preheated oven for 20-25 minutes until they are crispy and just starting to go golden. If you have any of the sauce left, heat it up gently in a pan and serve alongside the calzones to dip your crispy crust edges into.
Serves 4
Pizza Dough Ingredients
325ml water, luke warm
2 tbsp olive oil
1/2 tbsp caster sugar, preferably golden
1 x 7g sachet of dried yeast
500g strong white bread flour, plus extra for dusting
1/2 tsp salt, finely ground
Creamy Ricotta Pizza Sauce Ingredients
1 tbsp olive oil
2 medium red onions, diced small
2 tsp dried oregano
6 medium-large vine ripened tomatoes, diced small
200g ricotta cheese (one standard size pot)
Filling Ingredients
170g pancetta, diced very small
2 tbsp olive oil
200g purple sprouting broccoli, cut into 1-2 inch pieces
500g chicken breast, cut into 1.5 inch chunks
4 cloves of garlic, roughly chopped
3 tbsp lemon thyme leaves, freshly pulled from the sprigs
3 tbsp parmesan, finely grated
300g mozzarella, grated
Pizza Dough Method
In a jug or bowl mix the water, olive oil, sugar and yeast well and set to one side for a few minutes to 'come alive' while you place the sifted flour into a bowl and make a well in the centre. Pour the yeasty mixture into the well and stir together with a fork gradually incorporating the flour. When it starts to come together place the dough onto a clean and floured surface and knead it until you have a springy, smooth dough - this should only take a minute or so. Place this into a floured bowl, sprinkle the top of the dough ball with more flour and cover with a damp clean tea towel. Set this aside in a warmish place to rise for about an hour, it will pretty much double in size.
Pizza Sauce Method
Preheat the oven to 200 C / 400 F.
Heat the olive oil in a deep non stick pan and add the diced onions. Cook for 2-3 minutes and then sprinkle over the dried oregano. Cook for another 2-3 minutes, add the diced tomatoes and stir well. Cook on medium high heat for about 10 minutes until the tomatoes have melted down into mush and you have a fairly thick sauce. Turn off the heat and leave to cool for 5 minutes before mixing in the ricotta cheese. Leave this off the heat to cool while you roast your fillings.
Filling Method
Place all the ingredients into a roasting tray and mix around so everything is coated with the oil, then cook in the preheated oven for 20 minutes, stirring halfway through the cooking time.
Remove from the oven and leave to cool for ten minutes. Pour onto a chopping board and dice everything down into roughly 1cm chunks, cover and leave to cool completely.
Building The Calzone
Remove your risen dough from it's bowl and knead again on a clean floured surface. Give it some welly and punch it about a bit this time to get the elasticity going, then cut into either two or four chunks depending on how many calzone you are making.
Roll the chunks of dough out into rough circles that are about half a cm thick. Place one onto a baking sheet and slather it with a good layer of the creamy tomato sauce. Sprinkle over some of the parmesan and then pile up some of your filling covering only one half of the base. Cover that with a good layer of grated mozzarella and then fold the non-topped side over the top of the fillings and press down around the edges to seal it closed.
Repeat until you have all your calzones made and then bake in the still preheated oven for 20-25 minutes until they are crispy and just starting to go golden. If you have any of the sauce left, heat it up gently in a pan and serve alongside the calzones to dip your crispy crust edges into.
Notes
Please do use purple sprouting broccoli if you can get it, it has a more pronounced flavour and less water content than the bog standard green stuff.
The creamy tomato and ricotta sauce in this recipe is a good staple to have in your repertoire - use it as a sauce for pasta, pour it over chicken breasts and top with cheese and breadcrumbs before baking or even use it cold in a sandwich as an extra spreading of delicious moisture.
I know it seems like a lot of effort, but homemade pizzas are always so much better than any take away or premade thing you could buy. Even if you only make them once a year as a treat you should give these babies a go.