Showing posts with label Cream. Show all posts

Monday, 13 December 2010

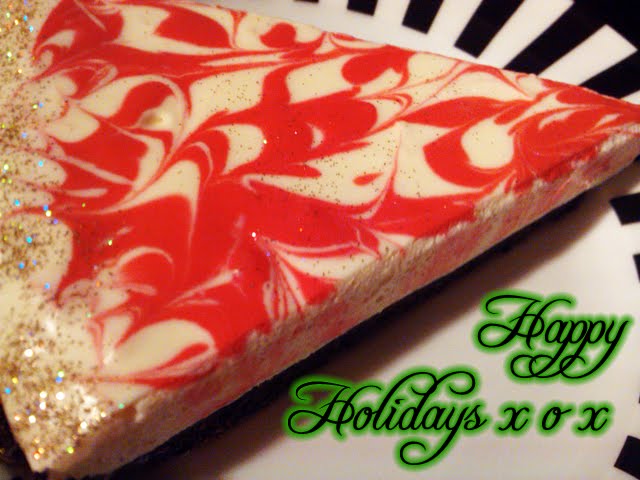
Creamy Candy Cane Pie

There's no denying it now, Christmas is truly upon us. I have gone into my regular festive stupor, wanting to decorate everything in the house (including the cat) and bake stupid amounts of sugar cookies (I have restrained myself from doing this so far). I have placed an outrageously large online food order concidering there's only the two of us. We have lobsters for Christmas eve (no we're not rich, they're frozen ones from Lidl!) and for Christmas breakfast this year we are having smoked salmon benedict and the obligatory fried halloumi - don't ask me why but this is a tradition of mine that's been going on since I was small.

In my house at least, dessert after our giant Christmas dinner was never that much of an event, my mum's roast being delicious enough (and large enough) to eclipse anything that may be plated out later. Plus after eating said giant meal no-one really fancies cramming in anything as rich and stodgy as a Christmas pud. I think this dessert will change all that though, as the creamy peppermint filling is light and refreshing with the base giving a lovely chocolatey hit, and its pretty red and white swirls add the required wow factor with a sprinkle of disco golden glitter.

On top of all that it is also very easy to make as it uses marshmallows to set the cream centre rather than gelatine. The only thing you need to remember is that it needs to chill in the fridge for at least 4 hours before serving, so I would suggest making it the night before, or even earlier as it can be frozen in its tin, well wrapped in cling film for up to a month. Just remember to put it in the fridge to defrost the night before you want to serve it!

Creamy Candy Cane Pie / Peppermint Swirl Pie
Serves 8 - 10

Base Ingredients
2 packets (300g) of double chocolate oreos
50 g unsalted butter, softened

Filling Ingredients
200g white mini marshmallows
240ml milk
2 tsp peppermint extract
375ml double cream
few drops of red food colouring

Other Equipment
25cm loose bottomed flan / tart tin
gold edible glitter

Base Method
Empty your packets of biscuits into a food processor and whizz up until you have crumbs. Add the softened butter and whizz again a few times until it starts to come together. Pour into your tart tin and push down using your fingers so you have an even layer covering the base and sides. Put into the fridge for an hour or so to chill and harden.

Filling Method
Melt the marshmallows and milk over a medium low heat until the milk just comes to a simmer, then remove from the heat and stir until the mixture is smooth and silky looking. Pour into a heat-proof bowl and mix in the peppermint extract, then leave to cool.

Now whisk the double cream to soft peak stage, and then, while still whisking, slowly add the minty marshmallow mix. When combined, remove about 2 tablespoons of the mix to a seperate bowl and stir in a few drops of red food colouring until you get the desired shade of red.

Take your hardened cookie base from the fridge, pour in the white marshmallow cream and smooth over the top with an angled spatula or knife. Now use a teaspoon to drip over the red coloured mix, then take a cocktail stick and swirl it around in the mixture to give a marbled effect. You can now add a sprinkle of edible glitter if you so desire.

Place your finished pie into the fridge and leave to set for at least 4 hours before serving. It is best to cut it with a warm knife so you don't spoil the pretty pattern on the top.

Another bonus to this pud? You don't need anything to accompany it but a fork!

Monday, 20 September 2010

Lychee Cupcakes with Rose & Mascarpone Whipped Cream Frosting and Rose Syrup Tuile Curls

Lychee Cupcakes with Rose & Mascarpone Whippe Cream Frosting and Rose Syrup Tuile Curls - The Inky Kitchen

Ladies and gents, prepare yourselves for a seriously girly recipe. Pink in colour with a creamy floral flavour, these are some very ladylike treats. Reminiscent of turkish delight, but with a cheesecakey edge to the frosting thanks to the mascarpone and whipped cream. The pureed lychees keep the sponge cake wonderfully moist, although I must admit that their perfume like flavour didn't come across as much as I'd like, so I added some to the frosting to amp it up a little. I do find it difficult to get more delicate fruit flavours to come through in cake batter - watermelon is another flavour that baking seems to cancel out.

The rose syrup tuile curls are like little flowery brandy snaps. Unfortunately they don't hold their crispness for too long so it is best to bake these and add them to the cakes just before serving so they keep their shape and crunch.

Lychee Cupcakes with Rose & Mascarpone Whippe Cream Frosting and Rose Syrup Tuile Curls - The Inky Kitchen

It may seem silly to some people to bake a batch of little cookies just to decorate some cupcakes, but that's just how I roll. A dessert on top of another dessert? Yes please! To be honest though, they were more of an experiment to see if I could make a rose version of this cookie from Dorie Greenspan's wonderful book Baking: From My Home To Yours. A real treasury of delicious treats and a must have for the avid baker, Dorie's book shows how to prepare these little cookies using maple syrup; but seeing as I had a lovely bottle of rose syrup on hand I thought it a good chance to have a play around and hopefully make a tasty and unusual cupcake topper. I think I succeeded!

I quartered the recipe from the book and still came up with too many tuile cookies, but adjusting it to make any fewer cookies would result in some seriously difficult ingredient measuring and I would never be averse to eating ten or so little leftover rosey curls...

The curl batter needs to be made the evening or morning before as it needs to refrigerate for at least 3 hours before baking. Of course they are optional, and could be replaced with a simple icing rose if anything at all, although the glitter is a must to create the required ludicrously girly visage.

Lychee Cupcakes with Rose & Mascarpone Whippe Cream Frosting and Rose Syrup Tuile Curls - The Inky Kitchen

Lychee Cupcakes with Rose & Mascarpone Whipped Cream Frosting and Rose Syrup Tuile Curls
Makes 12 standard American sized cupcakes

Rose Syrup Tuile Curl Ingredients
15g unsalted butter, at room temperature
15g light brown muscovado sugar, packed
30ml rose syrup
15g plain flour, sifted


Lychee Cupcake Ingredients
180ml pureed lychees (skinned and pitted)
60ml milk, at room temperature
1/2 tsp vanilla extract
200g plain flour
1 tsp baking powder
1/4 tsp salt

110g butter, softened
400g caster sugar
1 large egg
, at room temperature
2 large egg whites, at room temperature

Rose & Mascarpone Whipped Cream Frosting Ingredients
80ml pureed lychees
1 tbsp rose syrup (or see notes for an alternative)
75g mascarpone cheese, at room temperature
1/2 tsp vanilla extract
100ml double cream
300g icing sugar, sifted


Rose Syrup Tuile Curl Method
Mix the butter, sugar and rose syrup until well combined and then gently stir in the flour until just incorporated. Cover the dish with cling film and refrigerate for at least 3 hours or up to 1 week.

When you are ready to bake, preheat the oven to 200 C / 400 F while you line a baking tray with greaseproof paper and then wrap some more greaseproof around a rolling pin.

Spoon small hazelnut size scoops of the tuile batter onto the tray leaving around 2 inches space between them (they spread a lot) and then bake for 5-7 minutes until the edges turn golden brown but the centres are still a deep pink.

Remove the tray from the oven and leave the cookies to cool for about 10 seconds. Then take a thin flat palette (such as you use to smooth frosting) and gently slide it under a cookie seperating it from the paper. Gently life the cookie from the sheet and place it over the greaseproofed rolling pin - it will wrap around it making the required curl shape. If the cookies on the sheet become solid before you can curl them over the pin, just place the tray back in the oven for a few seconds so they soften up and become pliable again.

Repeat with the other cookies and leave them to cool on the rolling pin while you bake the next batch. When cool place on a piece of greaseproof paper in a safe area where they won't get knocked or broken while you bake the cupcakes.

Lychee Cupcakes Method
Preheat oven to 180 C / 350 F and line a tin with a dozen standard American cupcake liners or muffin liners.

Mix the pureed lychees withthe milk and vanilla extract and set aside. In another bowl combine the flour, baking powder and salt and set aside. Cream the butter for 2-3 minutes and then gradually add the sugar. When well combined and fluffy add the egg and egg whites and mix until just combined. Now add half of the flour mixture and blend, then add the lychee and milk mixture and combine before adding the final portion of flour. Mix until just combined.

Divide the batter between the cupcake liners and bake for 22-25 minutes until the tops are lightly golden and spring back to the touch. Leave to cool for ten minutes in the tray, then remove to a rack to cool completely before frosting.


Rose & Mascarpone Whipped Cream Frosting Method
Whip the double cream to stiff peaks and set aside. Beat the pureed lychees, rose syrup, mascarpone and vanilla extract and then gently stir in the whipped cream until just combined. Now fold in the sifted icing sugar until you reach the required spreadable/pipeable consistency - you may not need it all.

Spread over the completely cooled cupcakes and top with a tuile curl or your decoration of choice.

And a sprinkle of glitter. Don't forget the glitter.

Lychee Cupcakes with Rose & Mascarpone Whippe Cream Frosting and Rose Syrup Tuile Curls - The Inky Kitchen

Notes
I bought the rose syrup from my local supermarket in the ethnic foods section. It can also be found in many Asian and Indian supermarkets.

The rose syrup is necessary to make the tuile curls but for the frosting you could substitute the same quantity of rose water and a few drops of pink food colouring.

I think these would look beautiful with little fresh pink rose petals or buds on top, or a little cube of turkish delight would also be very fitting.

I know these seem outrageously feminine, but they got the thumbs up from some nice gents in my office. If you like turkish delight, I'm pretty sure you'll like these.

Lychee Cupcakes with Rose & Mascarpone Whippe Cream Frosting and Rose Syrup Tuile Curls - The Inky Kitchen

Monday, 6 September 2010

Creamy Chicken and Fennel with Handmade Garlic Roasted Gnocchi

Creamy Chicken and Fennel with Handmade Garlic Roasted Gnocchi - The Inky Kitchen

Fennel is a new obsession of mine, although to be honest I am yet to do anything more adventurous with it than roast it or use it in this very recipe. I love love love the fresh aniseedy taste, such an unusual flavour for a savoury dish but such a wonderful one that I have loved since first trying it back in February on Pete and I's first anniversary. It is that meal that this dish is loosely based around - a chicken breast stuffed with a mushroom duxelle and wrapped in parma ham, served with roasted sweet potatoes and a creamy white wine and fennel sauce.

We had gone to dinner at a Loughborough restaurant called Browns Lane which I have been going to under it's several different names for about the last ten years. It has always been amazing, and I suggest if you live in Charnwood you check it out one lunch or dinner time. I think it is very reasonably priced for the quality of food you are served and the decor is nice and simple, the eating area being on the first floor while there is a bar (that serves lovely cocktails) on the ground. I like it so much that as I have organised my work's Christmas party this year I have arranged for it to be there. This festive season will most definately be full of deliciousness!

Creamy Chicken and Fennel with Handmade Garlic Roasted Gnocchi - The Inky Kitchen

Back to this recipe however, I am aware that quite a lot of people don't like fennel. If this is the case in your household then either replace it with just 50g of finely chopped celery or leave it out altogether. It will still taste heavenly. I'm pretty sure you'd have to try very hard to make garlic, cream and chicken taste bad. I'd like to think my recipes are more like blueprints for you to amend as you please - that's the real joy of cooking after all.

The little potatoey 'dumplings' are fab with this dish, soaking up the velvety sauce and acting like tiny little garlic breads! I know it seems like a lot of work to make the gnocchi them from scratch but it's not hard at all. Two ingredients! That's all! And a little kneading never hurt anyone, or gentle fork squashing! But I suppose if you really don't want to do it you could just use the store bought variety, just make your own next time OK?


Creamy Chicken and Fennel with Handmade Garlic Roasted Gnocchi - The Inky Kitchen

Creamy Chicken and Fennel with Handmade Garlic Roasted Gnocchi
Serves 2 greedy, or 3 less greedy people as a main course

Garlic Roasted Gnocchi Ingredients
500g waxy potatoes, peeled and cut into roughly 2 inch chunks
200g good quality plain flour, preferably Italian 00
3/4 tsp salt
3/4 tsp black pepper
2 fairly big cloves of garlic, crushed
2 tbsp olive oil

Creamy Chicken and Fennel Ingredients
1 tbsp olive oil
1 large red onion, sliced into short thin lengths
100g fennel, sliced into short thin lengths
10 fresh sage leaves
2 large chicken breasts, cut into fairly small chunks
3 tbsp white wine
1 chicken stock cube
70g chestnut mushrooms, cut into fairly small chunks
150ml double cream

Garlic Roasted Gnocchi Method
Preheat the oven to 200 C / 400 F.

Place the potatoes into a large pot of boiling water and cook until just tender - when you push a knife into one you want it to go in with very little give and for the potato to not fall apart - this took ten minutes for me. Remove from the heat and drain well, then either push through a potato ricer or mash until very very smooth - lumps will be very apparent in the gnocchi.

Leave them to cool for a few minutes and then add the flour, salt and pepper and mix together. When it is combined place it on to a floured surface and knead for a few minutes until it has come together well and has a more dough like consistency. Next divide the ball into four and roll each one into a long sausage shape that is about 2cm thick, before cutting into 2.5cm lengths and pressing a fork gently into each one to create four indents. Set these aside in a bowl while you bring a large pan of salty water to the boil.

Boil the gnocchi in batches being careful not to overcrowd the pan so they don't stick together. The gnocchi are cooked when they float to the surface of the water. Remove them from the pan and let dry out a little on some kitchen towel. When they have all been boiled and dried off place them in a deep sided baking tray and pour over the olive oil and crushed garlic, then mix gently so as not to break them up and put them in the oven to cook while you make the cremay chicken. They will take anywhere between 20-30 minutes depending on your oven heat - you want them golden and crispy, it helps to give them a stir every ten minutes or so.


Creamy Chicken and Fennel Method
Heat the olive oil in a large deep frying pan and then cook off the onion and fennel for a few minutes until they become slightly translucent, then add the sage leaves and cook for a further 3-4 minutes.

Next add the diced chicken and cook until it is coloured all over and no more raw pink meat is visible before adding the white wine and crumbling over the stock cube. Give everything a good stir and then add the chopped mushrooms. Let them soften for a minute or so before stirring them in and cooking for another 7 or 8 minutes until the chicken is cooked through - check by cutting a piece in half and making sure it is white all the way through. Now pour over the double cream and raise the heat slightly, cooking for another 5-10 minutes while stirring frequently so the sauce thickens a bit.

By now the gnocchi should be roasted so plate it up, then pour over the lovely creamy chicken concoction and enjoy!

Creamy Chicken and Fennel with Handmade Garlic Roasted Gnocchi - The Inky Kitchen

Notes
I used red Rooster potatoes for this recipe as they are pretty waxy and have a lovely flavour. They're currently my favourite spud!

I think this recipe would also work really well with pork chunks instead of the chicken. Pork and sage is a great combination. Adding a little apple to the sauce would be lovely too I think.

Once again, I would not condone eating this regularly - so much starch and cream is really not good for you, but once in a while in moderation I'd say it's alright to treat yourself to something delicious and calorific! It's a very rich dish too, so I don't think I could eat it regularly if I tried!!!

Creamy Chicken and Fennel with Handmade Garlic Roasted Gnocchi - The Inky Kitchen


Wednesday, 30 June 2010

Whiteout Cake with White Chocolate Cream Frosting

Whiteout Cake with White Chocolate Cream Frosting

I must apologise for the lateness of this blog, I try to post every Sunday but unfortunately this week I got a nasty case of food poisoning from some mussels! Boo to them, it's definately put me off shellfish for a little while! Is it completely sad that the main reason my food poisoning upset me was because I couldn't blog? Hmm... shall I grab the geek glasses and scrunchie now?

I think I was mainly disappointed as I have been looking forward to trying this recipe ever since I bought BAKED - New Frontiers In Baking by Matt Lewis & Renato Poliafito. Flicking through this book you can't help to salivate at all the gorgeous looking recipes and beautiful photographs. Next on my list to try is the Root Beer Bundt Cake with Root Beer Fudge Frosting - my man is a real root beer enthusiast and I've never made a bundt cake before - how exciting!

Now anyone that knows me well will be able to tell you I have a slight white chocolate obsession. I just love that super sweet creamy taste but I have found it is often drowned out by other flavours in baking even if that's by accident. This cake really is the opposite. The cake is just a vanilla cake with a bit of a twist in the baking but the frosting is a white choccy lovers dream! I think that is the main thing that drew me to this book, the recipes all use very different techniques than I am used to - I am sure that my whole life will be spent looking for the perfect cake recipe.

Just a warning - do not leave the frosting unattended for long while it's cooking - I did and had to deal with the consequence of scrubbing burnt sugary goop from the bottom of my saucepan!

Whiteout Cake with White Chocolate Cream Frosting

Whiteout Cake with White Chocolate Cream Frosting
Adapted from
BAKED - New Frontiers In Baking by Matt Lewis & Renato Poliafito

Whiteout Cake Ingredients
350g cake flour (please see below notes for how to make this if you cannot buy it in bags)
35g plain flour
1 tbsp baking powder
1 tsp baking soda
3/4 tsp salt
110g butter, softened
110g vegetable shortening (such as Trex)
350g caster sugar
1 tbsp vanilla extract
1 large egg
360ml ice cold water
3 large egg whites
1/4 tsp cream of tartar

White Chocolate Cream Frosting Ingredients
150g white chocolate, roughly chopped
300g caster sugar
35g plain flour
375ml milk
80ml double cream
330g butter, soft and cut into small pieces
1 tsp vanilla extract

Whiteout Cake Method
Preheat the oven to 190C / 325F.

Butter three 8-inch round cake pans and line the bottoms with greaseproof baking paper. Sift the flours, baking powder, baking soda, and salt together into a large bowl and set aside.

Beat the butter and shortening on medium speed until creamy for about 3 to 4 minutes, then add the sugar and vanilla and beat on medium speed until fluffy, about another 3 minutes. Scrape down the bowl, add the egg, and beat until just combined. Mix on slow speed and add the flour mixture, alternating with the ice water, in three separate additions, beginning and ending with the flour mixture. Scrape down the bowl, then beat for a few more seconds to make sure everything is well combined.

In a medium bowl, whisk the egg whites and cream of tartar until soft peaks form making sure not to overbeat and then gently fold them into the batter.

Divide the mixture into the three pans and smooth off the tops. Bake for 40 to 45 minutes, rotating the pans halfway through, until a toothpick inserted in the center of each cake comes out clean.

Transfer the cakes to a wire rack and let cool for 20 minutes. Invert the cakes onto the rack, remove the pans, and let cool completely. Remove the parchment.


White Chocolate Cream Frosting Method
Melt the white chocolate and set it aside to cool - I use a microwave but you can do it over a double boiler if you prefer.

In a medium heavy-bottomed saucepan, whisk the sugar and flour together with the milk and cream and cook over medium heat, whisking occasionally, until the mixture comes to a boil and has thickened, about 20 minutes - keep your eye on it or you'll get a burnt brown goop!

Transfer the mixture to a metal bowl and beat on high speed until cool. Reduce the speed to low and add the butter, mixing until thoroughly incorporated. Increase the speed to medium/high and beat until the frosting is light and fluffy - about 3-4 minutes.

Add the vanilla extract and cooled white chocolate and continue mixing until combined. If the frosting is too soft, put the bowl in the refrigerator to chill slightly, then beat again until it is the proper consistency. If the frosting is too firm, set the bowl over a pot of simmering water and beat with a wooden spoon until it is loose enough.

To Assemble The Cake
Refrigerate the frosting for a few minutes until it can hold its shape well.

Place one cake layer on a serving platter, use a knife to flatten and smooth out the top then spread a good amount of the frosting on top. Add the next layer, cut and frost it the same way, and then add the third layer. Coat all over with a thin layer of frosting and then place the cake into the fridge for 15 minutes to set.

Now frost the sides with two thirds of the remaining frosting, smoothing to a nice rustic finish. Spoon the remaining frosting into a piping bag fitted with a large closed star nozzle and pipe little stars of frosting all over the top of the cake. Sprinkle with a bit of edible glitter if, like me, you are easily pleased by sparkly things.

Whiteout Cake

Notes
This cake will keep in a tin at room temperature for up to 3 days. If your room is not cool, place the covered cake in the fridge for up to 3 days, removing it to warm up slightly about 2 hours before you plan on serving it.

If you cannot find cake flour you can make your own -
120g /1 cup cake flour can be substituted with 85g plain flour plus 2 tbsp of cornflour.

I buy most of my cake decorating items such as edible glitter and cupcake cases from the following online stores - www.cakescookiesandcraftsshop.co.uk and www.makeawishcakeshop.co.uk

Whiteout Cake with White Chocolate Cream Frosting