Showing posts with label Chocolate. Show all posts

Sunday, 6 March 2011

Bourbon Chocolate Pecan Pie or Pete's Birthday 'Cake'

I should have known when I handed Pete copies of the two books by the 'Baked' duo and asked him to choose his birthday cake that it wouldn't end up the way I had planned. I was hoping that he'd go for the grasshopper or chocolate malt ball layer cakes, but it only took him about a minute to hand the book back pointing at page 97 with an 'I want that one' expression on his face. My response - "Well that's not a cake but if that's what you really want for your birthday...". I couldn't exactly say no could I?

As usual the thing Pete most desired required one of the few kitchen items I didn't have so an emergency shopping trip ensued for a correctly sized pie pan and a giant bag of pecan nuts. That's where my griping ends however because I really liked making this recipe - baking up a pie makes me feel incredibly housewifey. I can imagine myself in a little wooden house in Texas whipping up pastry in a gingham clad kitchen, leaving the finished pie to cool on the window sill. Yes I am ridiculous, and I love it.


The pastry recipe was perfect coming together perfectly with the exact liquid amount stated and giving a smooth, easily rollable texture that didn't tear at all. The filling was very easy to prepare too. Please remember that the pastry needs to chill for an hour in the fridge before you roll it and line the pie dish and then needs to freeze for at least 3 hours before you add te filling and bake - I made, chilled, rolled it and then popped it into the freezer and then went to do my chores in town so when I got back I was ready to fill and bake it.

I agree with the lovely Baked boys that you should be generous with the bourbon - I used Jack Daniels Single Barrel Select which you can buy in most supermarkets now. It costs more than your standard bourbon but it's worth it - Pete likes bourbon straight up and the cheaper ones just aren't that nice that way. Unless you're exceedingly rock n roll of course, but we both drink for the taste not for the side affects!

Serve this pie at room temperature with a good quality vanilla ice cream at a dinner party or sat on the sofa while watching something appropriate like Boardwalk Empire and drift off into a time gone by where dinner parties were daily, men had impressive moustaches and ladies were only happy if they looked picture perfect. Can I go back there please?


Bourbon Chocolate Pecan Pie
Serves 8-10
Taken from 'Baked : New Frontiers in Baking' by Matt Lewis and Renato Poliafito

Pie Dough Ingredients
200g plain flour
1.5 tsp caster sugar
1/2 tsp fine sea salt
125g unsalted butter, cold and cut into 1cm cubes
100ml ice cold water

Filling Ingredients
250g pecan halves, toasted in a 200 C / 400 F oven for 10 minutes
3 large eggs
180ml golden syrup or runny honey (or light corn syrup if you can get it)
4 tbsp dark brown sugar (packed into the spoon)
3 tbsp unsalted butter, melted
pinch of fine sea salt
1 tsp vanilla extract
3 tbsp bourbon
200g dark chocolate in chips or chunks (or a half and half mix of dark and milk if you prefer)

Pie Dough Method
In a bowl whisk together the flour, sugar and salt and then add the butter cubes and toss to coat them. Pour into a food processor and give it a few pulses until the butter is in little pieces about the size of a hazelnut. Now drizzle in the ice cold water through the feed tube while pulsing the machine until it comes together as a ball - keep your eye on it as you may not need all the water.

As soon as this happens remove the dough from the processor, give it a very quick few kneads and then flatten into a disc and wrap in cling film. Refrigerate for a minimum of one hour and a maximum of 3 days.

When chilled remove from the fridge and roll out on a floured surface to about a 12" round. Drape over the pie dish and gently work it in folding any overhanging pastry under before crimping the edge. Wrap in cling film and freeze for a minimum of 3 hours (maximum 3 months) before filling and baking.

Filling Method
Preheat the oven to 170 C / 325 F then take 100g of the toasted pecans and chop roughly before setting aside.

Lighlty whisk the eggs in a large bowl until just combined and then add the syrup/honey, sugars, melter butter, salt, vanilla and bourbon. Whisk again until combined and then stir in the chopped pecans.

Remove your frozen pie shell from the oven and evenly sprinkle in the chocolate chunks. Pour over the filling and then top with the remaining pecan halves.

Bake in the centre of the oven for 30 minutes, then remove and cover the pie edges with tin foil before returning to the oven for another 30 minutes. Test to see if the pie is done by inserting a knife into its centre - if it comes out clean it is done, if it comes out with clumps of filling stuck to it you need to bake for another 5 minutes and then test again.

Cool on a rack and serve warm or at room temperature. This pie can be kept covered in the fridge for up to 2 days.

Sunday, 30 January 2011

Rhubarb and Custard Cameo Cupcakes & a Brand New Blog Layout!


Hello there! It's been a while hasn't it? Far too long I say, but I'm back now and as The Inky Kitchen has had a bit of a facelift I thought it was only right to celebrate with some delicious cupcakes. Not just any cupcakes either, cupcakes that celebrate two of my favourite things - rhubard and custard sweets and Victorian cameo jewellery.


If you're British and born pre-1990 then you will surely remember those little magenta and buttercup coloured boiled sweets, both tart and creamy at the same time , glistening in big plastic jars on corner shop shelves. Their flavour is such a strong childhood memory to myself and so many others, just like the cupcake, so what better than combining the two into one special teatime treat.

Obviously the white chocolate cameos are not mandatory, I was just itching to use my new mould, but if you would like to you can buy the mould here. I bought the little sugar pearls from this online shop where I buy a lot of my baking supplies including edible glitter, cupcake cases and cookie cutters.

I would love to know what you think of the new layout too, do let me know!


Rhubard and Custard Cupcakes
Makes 16-20 depending on case size
Recipe adapted from Cupcakes by Martha Stewart

Rhubard Cupcake Ingredients
125g unsalted butter, softened
200g caster sugar
2 eggs, room temperature
1 tsp vanilla extract
200g plain flour
1/2 tsp baking powder
1/2 tsp baking soda
pinch of salt
115g sour cream, room temperature
2 stalks of rhubarb, trimmed and cut into small chunks

Custard Buttercream Frosting Ingredients
120ml milk
75g (one sachet) Bird's custard powder
125g unsalted butter, softened
1 tsp vanilla extract
500g icing sugar
a few drops of pink food colouring, if using

White Chocolate Cameos
100g white chocolate, finely chopped
plastic cameo mould as shown above

Cupcakes Method
Preheat the oven to 180 C / 350 F and line a muffin pan with cupcake liners. Set aside.

Cream the butter and sugar until light and fluffy and then add the eggs, one at a time, beating well after each addition, and then add the vanilla extract. Add half the flour, baking powder and soda and pinch of salt and mix well, then add the sour cream. Now add the second half of the flour and mix until just combined, before gently stirring in the diced rhubarb.

Divide between the cases and bake for 20-25 minutes until the tops spring back when touched and an inserted toothpick comes out clean. Set aside to cool completely before frosting.

Chocolate Cameo Method
Melt half of the chopped chocolate in the microwave or over a water bath, then remove from the heat and beat in the rest of the chopped chocolate. This is a very easy way of 'tempering' the chocolate so that it has a nice shiny finish when set again.

Carefully spoon the chocolate into the voids in the mould and then tap several times on your worktop to remove any trapped air bubbles. Refrigerate until needed.

Buttercream Method
Heat four tablespoons of the milk until just boiling, and then whisk in the custard powder, set aside to cool a little. Beat the butter and vanilla extract and then add the cooled custard paste along with the rest of the cold milk and the food colouring if using. Beat until well combined and then start adding the icing sugar. You may not need it all, just keep adding and mixing until you get the desired consistency.

Spread or pipe over the frosting and then add your decorations.


Monday, 13 December 2010

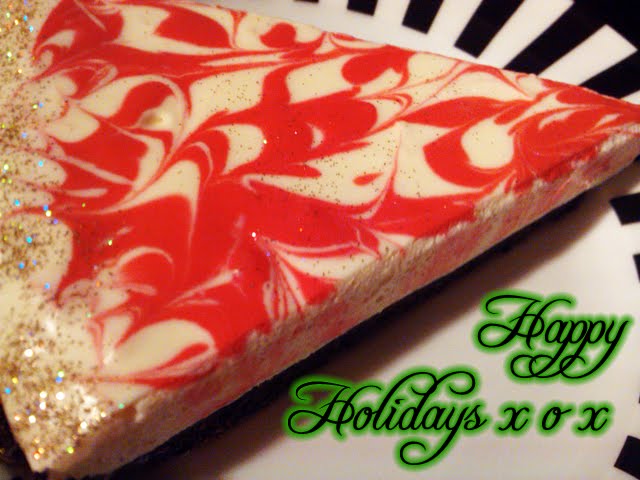
Creamy Candy Cane Pie

There's no denying it now, Christmas is truly upon us. I have gone into my regular festive stupor, wanting to decorate everything in the house (including the cat) and bake stupid amounts of sugar cookies (I have restrained myself from doing this so far). I have placed an outrageously large online food order concidering there's only the two of us. We have lobsters for Christmas eve (no we're not rich, they're frozen ones from Lidl!) and for Christmas breakfast this year we are having smoked salmon benedict and the obligatory fried halloumi - don't ask me why but this is a tradition of mine that's been going on since I was small.

In my house at least, dessert after our giant Christmas dinner was never that much of an event, my mum's roast being delicious enough (and large enough) to eclipse anything that may be plated out later. Plus after eating said giant meal no-one really fancies cramming in anything as rich and stodgy as a Christmas pud. I think this dessert will change all that though, as the creamy peppermint filling is light and refreshing with the base giving a lovely chocolatey hit, and its pretty red and white swirls add the required wow factor with a sprinkle of disco golden glitter.

On top of all that it is also very easy to make as it uses marshmallows to set the cream centre rather than gelatine. The only thing you need to remember is that it needs to chill in the fridge for at least 4 hours before serving, so I would suggest making it the night before, or even earlier as it can be frozen in its tin, well wrapped in cling film for up to a month. Just remember to put it in the fridge to defrost the night before you want to serve it!

Creamy Candy Cane Pie / Peppermint Swirl Pie
Serves 8 - 10

Base Ingredients
2 packets (300g) of double chocolate oreos
50 g unsalted butter, softened

Filling Ingredients
200g white mini marshmallows
240ml milk
2 tsp peppermint extract
375ml double cream
few drops of red food colouring

Other Equipment
25cm loose bottomed flan / tart tin
gold edible glitter

Base Method
Empty your packets of biscuits into a food processor and whizz up until you have crumbs. Add the softened butter and whizz again a few times until it starts to come together. Pour into your tart tin and push down using your fingers so you have an even layer covering the base and sides. Put into the fridge for an hour or so to chill and harden.

Filling Method
Melt the marshmallows and milk over a medium low heat until the milk just comes to a simmer, then remove from the heat and stir until the mixture is smooth and silky looking. Pour into a heat-proof bowl and mix in the peppermint extract, then leave to cool.

Now whisk the double cream to soft peak stage, and then, while still whisking, slowly add the minty marshmallow mix. When combined, remove about 2 tablespoons of the mix to a seperate bowl and stir in a few drops of red food colouring until you get the desired shade of red.

Take your hardened cookie base from the fridge, pour in the white marshmallow cream and smooth over the top with an angled spatula or knife. Now use a teaspoon to drip over the red coloured mix, then take a cocktail stick and swirl it around in the mixture to give a marbled effect. You can now add a sprinkle of edible glitter if you so desire.

Place your finished pie into the fridge and leave to set for at least 4 hours before serving. It is best to cut it with a warm knife so you don't spoil the pretty pattern on the top.

Another bonus to this pud? You don't need anything to accompany it but a fork!


Monday, 8 November 2010

Hummingbird Cake with Chocolate Cream Cheese Frosting

Hummingbird Cake with Chocolate Cream Cheese Frosting - The Inky Kitchen

Firstly, I'm really sorry about the bad quality photos on this post. This weekend was very hectic and I just didn't find time to photograph this cake in natural daylight and as it was quickly shot on my phone camera they really don't look that great.

But apologies out of the way, because this cake is absolutely delicious and super easy to make, as is the frosting. Really, you just dump everything in a bowl, mix it together and then bake. There's no butter in the batter which did worry me at first, however after tasting you really cannot tell - the banana keeps it so moist and the 4 eggs seem to make up for the lack of any other dairy. As Julie Powell once said "Think it over, any time you taste something that's delicious beyond imagining and you say 'what's in this?' the answer is always going to be butter
" - but not this time Julie!

A hummingbird cake isn't usually frosted with chocolate, but as I have started a diet today I wanted to pack in as many possible calories yesteday and went all out, and I think it worked wonderfully. Adding a spoon of chocolate spread is an easy cheat to get a rich chocolatey frosting when you have forgotten to buy some chocolate to melt in... oops. If you would prefer, just omit the cocoa and chocolate spread so you have a vanilla frosting instead.

Hummingbird Cake with Chocolate Cream Cheese Frosting - The Inky Kitchen

Hummingbird Cake with Chocolate Cream Cheese Frosting
Adapted from a recipe by Paula Deen
Serves 12-16 people

Hummingbird Cake Ingredients
375g self-raising flour
200g light muscovado sugar
200g caster sugar
170ml vegetable oil
50g pecan nuts, finely chopped
2 large ripe bananas, mashed
200g crushed pineapple and it's juice (from a tin)
1 tsp vanilla extract
1 tsp ground cinnamon
4 eggs

Chocolate Cream Cheese Frosting Ingredients
500g icing sugar, sifted
3 tbsp cocoa powder
200g full fat cream cheese
, at room temperature
100g unsalted butter, at room temperature
1 tsp vanilla extract
1 tbsp milk
1 heaped tbsp chocolate spread

Hummingbird Cake Method
Preheat oven to 170 C / 325 F, then grease and line three 8" baking tins and set aside.

Place all the cake ingredients into a large bowl and mix until well combined.

Divide between the three tins and bake, rotating the tins after 15 minutes,
for 25-30 minutes until the tops spring back when you gently pressed with your fingertip.

Remove from the oven and leave to cool for 10 minutes before removing from their tins and placing on a wire rack to cool completely.

Chocolate Cream Cheese Frosting Method
Make sure your cream cheese and butter are at room temperature or you will have lumpy frosting!

Place all ingredients into a large bowl and mix until smooth and creamy and of a good spreadable consistency.

Cake Construction
Using a serrated knife trim the tops of the cakes so they are all flat.

Place the first layer onto your cake plate and spread on 1/4 of the frosting. Place on the second layer bottom side up and spread with another 1/4. Place the last layer on top, bottom side up again, and use the remaining frosting to cover the cake.


Hummingbird Cake with Chocolate Cream Cheese Frosting - The Inky Kitchen

Notes
I reserved some of the frosting for piping on decoration and added a homemade florentine cookie as I had some left from earlier, but the cake looks just as lovely smoothed over and sprinkled with some more chopped pecans.

This cake is best kept refrigerated because of the cream cheese in the frosting - just remove it from the fridge 10-15 minutes before serving to take off a little of the chill.


I used this recipe from Delia for the florentine cookies, which were a present for Pete's Grandad on his birthday, but I added a little chopped stem ginger to them too!

Wednesday, 30 June 2010

Whiteout Cake with White Chocolate Cream Frosting

Whiteout Cake with White Chocolate Cream Frosting

I must apologise for the lateness of this blog, I try to post every Sunday but unfortunately this week I got a nasty case of food poisoning from some mussels! Boo to them, it's definately put me off shellfish for a little while! Is it completely sad that the main reason my food poisoning upset me was because I couldn't blog? Hmm... shall I grab the geek glasses and scrunchie now?

I think I was mainly disappointed as I have been looking forward to trying this recipe ever since I bought BAKED - New Frontiers In Baking by Matt Lewis & Renato Poliafito. Flicking through this book you can't help to salivate at all the gorgeous looking recipes and beautiful photographs. Next on my list to try is the Root Beer Bundt Cake with Root Beer Fudge Frosting - my man is a real root beer enthusiast and I've never made a bundt cake before - how exciting!

Now anyone that knows me well will be able to tell you I have a slight white chocolate obsession. I just love that super sweet creamy taste but I have found it is often drowned out by other flavours in baking even if that's by accident. This cake really is the opposite. The cake is just a vanilla cake with a bit of a twist in the baking but the frosting is a white choccy lovers dream! I think that is the main thing that drew me to this book, the recipes all use very different techniques than I am used to - I am sure that my whole life will be spent looking for the perfect cake recipe.

Just a warning - do not leave the frosting unattended for long while it's cooking - I did and had to deal with the consequence of scrubbing burnt sugary goop from the bottom of my saucepan!

Whiteout Cake with White Chocolate Cream Frosting

Whiteout Cake with White Chocolate Cream Frosting
Adapted from
BAKED - New Frontiers In Baking by Matt Lewis & Renato Poliafito

Whiteout Cake Ingredients
350g cake flour (please see below notes for how to make this if you cannot buy it in bags)
35g plain flour
1 tbsp baking powder
1 tsp baking soda
3/4 tsp salt
110g butter, softened
110g vegetable shortening (such as Trex)
350g caster sugar
1 tbsp vanilla extract
1 large egg
360ml ice cold water
3 large egg whites
1/4 tsp cream of tartar

White Chocolate Cream Frosting Ingredients
150g white chocolate, roughly chopped
300g caster sugar
35g plain flour
375ml milk
80ml double cream
330g butter, soft and cut into small pieces
1 tsp vanilla extract

Whiteout Cake Method
Preheat the oven to 190C / 325F.

Butter three 8-inch round cake pans and line the bottoms with greaseproof baking paper. Sift the flours, baking powder, baking soda, and salt together into a large bowl and set aside.

Beat the butter and shortening on medium speed until creamy for about 3 to 4 minutes, then add the sugar and vanilla and beat on medium speed until fluffy, about another 3 minutes. Scrape down the bowl, add the egg, and beat until just combined. Mix on slow speed and add the flour mixture, alternating with the ice water, in three separate additions, beginning and ending with the flour mixture. Scrape down the bowl, then beat for a few more seconds to make sure everything is well combined.

In a medium bowl, whisk the egg whites and cream of tartar until soft peaks form making sure not to overbeat and then gently fold them into the batter.

Divide the mixture into the three pans and smooth off the tops. Bake for 40 to 45 minutes, rotating the pans halfway through, until a toothpick inserted in the center of each cake comes out clean.

Transfer the cakes to a wire rack and let cool for 20 minutes. Invert the cakes onto the rack, remove the pans, and let cool completely. Remove the parchment.


White Chocolate Cream Frosting Method
Melt the white chocolate and set it aside to cool - I use a microwave but you can do it over a double boiler if you prefer.

In a medium heavy-bottomed saucepan, whisk the sugar and flour together with the milk and cream and cook over medium heat, whisking occasionally, until the mixture comes to a boil and has thickened, about 20 minutes - keep your eye on it or you'll get a burnt brown goop!

Transfer the mixture to a metal bowl and beat on high speed until cool. Reduce the speed to low and add the butter, mixing until thoroughly incorporated. Increase the speed to medium/high and beat until the frosting is light and fluffy - about 3-4 minutes.

Add the vanilla extract and cooled white chocolate and continue mixing until combined. If the frosting is too soft, put the bowl in the refrigerator to chill slightly, then beat again until it is the proper consistency. If the frosting is too firm, set the bowl over a pot of simmering water and beat with a wooden spoon until it is loose enough.

To Assemble The Cake
Refrigerate the frosting for a few minutes until it can hold its shape well.

Place one cake layer on a serving platter, use a knife to flatten and smooth out the top then spread a good amount of the frosting on top. Add the next layer, cut and frost it the same way, and then add the third layer. Coat all over with a thin layer of frosting and then place the cake into the fridge for 15 minutes to set.

Now frost the sides with two thirds of the remaining frosting, smoothing to a nice rustic finish. Spoon the remaining frosting into a piping bag fitted with a large closed star nozzle and pipe little stars of frosting all over the top of the cake. Sprinkle with a bit of edible glitter if, like me, you are easily pleased by sparkly things.

Whiteout Cake

Notes
This cake will keep in a tin at room temperature for up to 3 days. If your room is not cool, place the covered cake in the fridge for up to 3 days, removing it to warm up slightly about 2 hours before you plan on serving it.

If you cannot find cake flour you can make your own -
120g /1 cup cake flour can be substituted with 85g plain flour plus 2 tbsp of cornflour.

I buy most of my cake decorating items such as edible glitter and cupcake cases from the following online stores - www.cakescookiesandcraftsshop.co.uk and www.makeawishcakeshop.co.uk

Whiteout Cake with White Chocolate Cream Frosting

Sunday, 13 June 2010

Slow Cooker Pulled Pork with Spicey Honey Rum Barbecue Sauce

Slow Cooker Pulled Pork - The Inky Kitchen

I love Southern American cooking and music and barbecue is one of the quintessential southern tastes, they take it to almost fanatical lengths with many hugely popular barbecue competitions and restaurants across the country. Over here in the UK we seem to be lacking them - I have heard of one London based place but that's about it, so to get my fix I have to do it home made. Having no garden makes this a little difficult but lately I've seen several recipes floating around for indoor cooked bbq style food.

One recipe I have seen a lot of but never actually tried is pulled pork - slow cooked pork butt/shoulder that becomes so tender you can literally ease it into shreds with two forks. This is usually made in a smoker on the barbecue but can be done in a slow cooker to great effect - I confess I don't actually own one, I've never seen a slow cooker recipe I've ever wanted to make before, so I borrowed one from Pete's mum.

Slow Cooker Pulled Pork - The Inky Kitchen

The pork came out beautifully, I had a 1.5kg piece of pork shoulder which I but into three and cooked for 5 hours on high. When the timer went I grabbed two forks and tried to pull out a piece but it literally fell apart as I tried - perfectly succulent and tender! I probably could have squeezed another 1.5kg in the slow cooker I had, but then I recon the cooking time would have been 8 or 9 hours at least. My piece made enough pork to fill 8 bread rolls generously - I could only manage to eat one roll it was so filling!

This would be really great to have as part of a bbq buffet, and as you do it in the slow cooker it doesn't take up any more room on the grill. It is sure to impress, especially with homemade honey rum barbecue sauce - I think I'm going to have to bottle up a supply so we never have to buy any again!


Served up in some tasty seeded buns with a good dollop of creamy coleslaw this is a perfect meal - remember to put out a bowl of extra sauce, people are sure to want some! (It's great on chips!)

Smoked Paprika and Honey Rum

Slow Cooker Pulled Pork with Spicey Honey Rum Barbecue Sauce
Makes 8 generously filled rolls

Pulled Pork Ingredients
1.5kg pork shoulder/butt

25g dark muscovado sugar
2 tbsp maldon salt
3/4 tbsp garlic granules
1/2 tbsp ground black pepper
1 heaped tsp smoked paprika
1 tsp dried oregano
1 tsp cayenne pepper
1 tsp coarse grain mustard
1/2 tsp worcestershire sauce
1/2 tsp maggi liquid seasoning / liquid smoke
1/4 cup red wine vinegar
1/4 cup cider vinegar

2 medium onions, sliced into think rings
2 cloves of garlic, roughly chopped

Spicey Honey Rum Barbecue Sauce Ingredients
250ml honey rum
250ml tomato ketchup (low sugar if possible)
60g dark muscovado sugar
60ml cider vinegar
1 tbsp lemon juice
1 tbsp balsamic vinegar
1 tbsp light soy sauce
1 tbsp dark soy sauce
1 tbsp maggi liquid seasoning
1 tbsp worcestershire sauce
60ml full fat coca cola
1 tbsp tomato puree
1 tsp english mustard
1 tsp smoked paprika
1/2 tsp cayenne pepper
3 cloves of garlic, minced
20g butter
salt and pepper

Pulled Pork Method

THE NIGHT BEFORE
Cut the pork shoulder into three roughly equal sized pieces and place into a strong ziplock food bag. Mix all the ingredients except the onion and garlic cloves in a bowl and then pour into the bag with the meat. Seal the bag and squish it around a bit so everything gets nicely coated, then place in the fridge to marinate overnight.

ON THE DAY OF SERVING
Remove the marinating pork from the fridge and set to one side. Chop the onions and garlic cloves and place in the bottom of the slow cooker followed by the pieces of pork. Next pour over the marinade from the ziplock bag and place on the slow cookers lid.

Cook on high power for 5 hours, then remove the pieces of meat to a plate or tray and shred with two forks - if the meat does not shred easily it will need more cooking so place it back into the slow cooker for another hour and try shredding again.

Discard the liquid and onions (you do not need these) and place the pork back into the turned off slow cooker until serving time.

Barbecue Sauce Method
Place all ingredients into a saucepan (preferably non-stick) and mix well. Simmer over a medium to low heat for 20-25 minutes until the sauce has thickened, remove and throw away the pieces of onion, and place in a bowl or bottle until needed.

Once simmered down and thickened I had around 400ml of sauce.

To Serve
Pour two thirds of the barbecue sauce over the shredded pork and mix until it is all coated. If needed, cook on medium for a further 15 minutes until heated through.

Place a generous mound of meat into a seeded roll and serve with some good quality creamy coleslaw and a pickle on the side.

Slow Cooker Pulled Pork - The Inky Kitchen

Notes
This recipe is great value as it will feed about 8 people with a piece of meat that costs around £5.00.

We were given our honey rum as a gift last time Pete's parents went on holiday but I have seen it in several off licenses and a few supermarkets. Any nice sweet spirit will do - bourbons are always good in barbecue and I think a dark rum would work well too.

Maggi liquid seasoning is available in many supermarkets in the world foods section, it is a little bottle with a bright yellow lable so you shouldn't miss it.

If you want to save time, you can use a store bought barbecue sauce - we like the Jack Daniels range that you can buy in most supermarkets.


Triple Chocolate and Mocha Cupcakes - Nancy's Sweet Treat Boutique

And this is just a photo of some cupcakes I made for Pete to take in to his colleagues at work. The ones with the red chocolate hearts are triple chocolate and the others are double chocolate mocha.

Friday, 14 May 2010

Baking for Becca

Cupcakes for the Jayne Doe Tattoo Crew

I have another appointment with the lovely Tiny Miss Becca tomorrow to get more colour put into the back piece she is doing on me. She has a gorgeous Victorian-esque shop in Hornchurch, Essex called Jayne Doe Tattoo. It's quite a drive from here in little old Loughborough but oh so worth it for her work!!! Here's the line work so far...

Linework of my upper back piece by Tiny Miss Becca

This is an old photo, I actually already have some colour on the shoulder closest to the front. The roses are beautiful blues and purples and we'll be doing some more colouring tomorrow.

Cupcakes for the Jayne Doe Tattoo Crew

As we know, everyone loves presents, so I'm taking Becca and the crew a box of cupcakes and a vegan banana loaf to make the Saturday even sweeter. The cupcakes are vanilla cake with vanilla buttercream frosting and chocolate cake with ganache filling and chocolate buttercream frosting, all fancied up with printed icing discs of the shops logo and lots of glitter and sprinkles.

Cupcakes for the Jayne Doe Tattoo Crew

I really love these rice paper butterflies, I got them shipped over from Paris last year. They were expensive but very worth it - I got a box of 40 butterflies and there must be at least 20 different colour ways and butterfly shapes in there. I only use these for very special people and occasions!

Cupcakes for the Jayne Doe Tattoo Crew

I ordered the lovely printed icing discs from http://www.eatyourphoto.co.uk who are just wonderful. I ordered at 9am and received an email saying my discs had been dispatched just 2 hours later! I got twelve discs measuring 5.4cm across for £6.00, a few years ago I used them to order a larger icing photo for my Dad's birthday cake which turned out fab too - I'm definitely jonesing for a food colouring printer for Christmas!!! Hint hint Pete!!!

Sunday, 9 May 2010

Nancy's Best Chocolate Chunk Cookies

Best Chocolate Chip Cookies - The Inky Kitchen

Cookies are not something I make very often. I think it's a combination of the fact that I always get distracted by cake recipes and that Pete and I will sit and eat a whole big batch in one sitting as they are so moreish. I wish my metabolism would allow me to do this with no ill effects on my already suffering waistline, but it just won't. I get ridiculously jealous of those lucky lucky women who can plough through dozens of cupcakes and cookies and stay thin and gorgeous (cough... Natalie of Bake and Destroy... cough) but for me, those treats go straight to my thighs. But, my green eyed monster being pushed aside, these cookies really are worth an extra half hour on the cross trainer.

Best Chocolate Chip Cookies - The Inky Kitchen

The perfect cookie recipe is one of the holy grails of baking and I think this gets pretty close - it has taken long enough to develop! Chopped cold butter? Room temperature butter? Melted butter? A mix of sugars? Which kinds of chocolate? Nuts or no nuts? So many ingredient decisions to make and quantities to change! The cooking time is also a very important part of a perfect cookie. I am definitely a chewy gooey fan, but I do know some crispy cookie lovers so have given cooking times for both styles. I have used walnuts in my recipe also but if you are allergic or just plain hate nuts feel free to leave them out altogether, you could add in another 50g of chocolate if you so desire.

Best Chocolate Chip Cookies - The Inky Kitchen

Nancy's Best Chocolate Chunk Cookies
Makes 20 large cookies

Ingredients
125g slightly salted butter, melted
100g caster sugar
200g dark muscovado sugar
1 whole egg
1 egg yolk
1 tbsp vanilla extract
250g plain flour
1/2 tsp bicarbonate of soda
1 tsp salt
200g milk chocolate, roughly chopped
100g dark chocolate, roughly chopped
100g walnuts, roughly chopped (optional)

Method
Preheat the oven to 170 C / 338 F and line two baking trays with greaseproof paper.

Beat together the melted butter, caster and muscovado sugars until no lumps remain, then add the eggs and vanilla essence and mix until light and creamy - around 2-3 minutes.

Mix in the flour, bicarbonate of soda and salt until just blended and then stir in the chocolate and walnut chunky by hand with a wooden spoon - the mixture is very thick and chunky now and therefore it may damage your hand beaters or stand mixer.

Drop very heaped tablespoons of the cookie dough onto the baking sheets leaving around 8cm between them (I baked four cookies on each tray at a time).

Bake in the preheated oven for 12 to 13 minutes for chewy cookies or 16 to 17 minutes for crisp cookies. Remove and let cool for a few minutes on the baking tray before removing to a cooling rack and baking the next batch. Try one warm out of he oven - so so good!

Best Chocolate Chip Cookies - The Inky Kitchen

Notes
I like to chop the dark chocolate quite finely and the milk chocolate into pretty big chunks, that way the dark chocolate is distributed better through the dough so the cocoa flavour is always present, and then you'll hit a big milk chocolate chunk deposit every now and again which is always nice!

Try and use the best chocolate you can get, after all, it is the star of the recipe.

The dark muscovado gives a real caramelly taste to the cookies which the walnuts accent really well, but as I said before, the nuts are optional but highly recommended!

And look how pretty they are wrapped up as a present - who wouldn't be thrilled to be given this as a gift...?


Best Chocolate Chip Cookies - The Inky Kitchen

And a side note...
Today I was drinking some cream soda and decided I needed some ice cubes so I grabbed some from the freezer. It was only after throwing them in that I realised I had grabbed the white wine cubes that I always keep in the freezer in case I need a little wine for a recipe and don't feel like drinking the rest of the bottle. As it turns out, cream soda and white wine go together really well! I think it's my new summer drink of choice. Second to Pimms of course...

Best Chocolate Chip Cookies - The Inky Kitchen

Tuesday, 4 May 2010

Chocolate Frosted Banana Loaf Cake

Chocolate Frosted Banana Bread - The Inky Kitchen

Waste is one of my pet peeves. If I roast a chicken I will make it last at least two meals and I will usually use the carcass to make stock. It's not being cheap, it is being sensible and sensitive of the fact that there are millions of people all over the world that have no food at all. I know my not throwing away chicken bones isn't helping them but it helps me remember to be grateful for what I have.

Bananas are a thing that goes to waste a lot, we buy them in big bunches and then when their yellow skin is splodged with brown and they are too ripe to eat as is we just throw them away. No no no! There are lots of delicious things you can make with over ripe bananas - milkshakes, smoothies, bannoffee desserts, slice them and cover them in lovely warm creamy custard... the list goes on. But as I am so often inclined, I take the cake road.

Chocolate Frosted Banana Bread - The Inky Kitchen

Banana bread is a teatime staple but is very often overlooked as an old fashioned recipe. This version is beautifully moist and fills your whole house with the sweet, spicy smell of baking. It is not a traditional banana bread, more a banana loaf cake and the slather of dreamy chocolate frosting offsets the light spicing wonderfully.

If you can manage to, wrap the cooled loaf in cling film and then frost the next day. The beautiful dampness seems to intensify if you leave it overnight.

Chocolate Frosted Banana Bread - The Inky Kitchen

Chocolate Frosted Banana Loaf Cake
Serves 8-10
Adapted from a recipe in The Hummingbird Bakery Cookbook by Tarek Malouf

Cake Ingredients
200g ripe bananas, mashed (this is about 2 large bananas)
140g slightly salted butter, melted
280g plain flour
230g light brown sugar
40g dark brown sugar
2 eggs
1/2 tsp vanilla extract
1 tsp baking powder
1 tsp bicarbonate of soda
1 tsp ground cinnamon
1 tsp ground ginger
1/8 tsp ground nutmeg


Frosting Ingredients
60g slightly salted butter at room temperature
100g milk chocolate, melted and slightly cooled
1 tbsp milk
1/2 tsp vanilla extract
1 heaped tbsp cocoa powder
300g icing sugar, sieved


Cake Method
Preheat the oven to 170C / 325F.

Beat the sugar, vanilla and eggs until well mixed and then add the mashed banana and stir again.

Next add the dry ingredients - flour, baking powder, bicarbonate of soda, cinnamon, ginger and nutmeg - and mix thoroughly until no lumps remain.

Slowly pour in the melted butter while mixing and beat until smooth. Pour into a greased 23 x 13 cm loaf tin and smooth over the top with a spatula or palette knife.

Bake on the middle shelf of the oven for an hour or until a knife slid into the centre of the cake comes out clean with no raw batter on it. Leave to cool in the tin for around fifteen minutes before removing and placing it on a cake platter. If you can, leave covered in cling film overnight before frosting.


Frosting Method
Beat the butter, milk and vanilla extract with the cocoa powder until smooth, then add the slightly cooled melted chocolate.

Mix until well blended and then add the icing sugar one tablespoon at a time until a spreadable consistency is achieved. You may not need to use the whole 300 grams.

Spread rustically over the cooled banana loaf cake and then, if you wish, decorate with little icing flowers and a little edible glitter.


Chocolate Frosted Banana Bread - The Inky Kitchen

Cheeky Extra Recipe
Take two medium or three small ripe bananas, roughly chop and put into a blender. Add one large scoop of vanilla ice cream, a small cup of milk and a heaped tablespoon of honey. Blend until smooth and you have a delicious and (fairly) healthy milkshake!

Monday, 3 May 2010

Baking Update and Wonderful Tea!

Just a quick update of some of the orders I've had recently...

Chocolate and Vanilla Mini Cupcakes

Chocolate and vanilla mini cupcakes.

Chocolate Mini Cupcakes

Chocolate mini cupcakes.

Vanilla Mini Cupcakes

Vanilla mini cupcakes.

Double Chocolate Layer Cake

Double chocolate layer cake.

My First Attempt At Macarons

Pink vanilla macarons with milk chocolate ganache. My first attempt at macarons!

Mr Scruff Herbal Teas

And this is just a photo of the coolest tea around! Mr Scruff tea!!! My friends Jon and Sarah bought it from a local health store, Mr Scruff is a musician you should check out if you don't know who he is.

Monday, 19 April 2010

Chocolate Salted Caramel Cupcakes

Chocolate Salted Caramel Cupcake - The Inky Kitchen

Cupcakes are my realm. I've been making them for the last 4 or 5 years, originally just as a hobby, then as a little business on the side of my full time job, but always for pleasure. I just find baking a lovely way to spend time, the alchemy of the mixing and the baking and the beautification process of tinting the buttercream, piping pretty swirls and sprinkling with glitters and sugar shapes or crafting little icing roses and deities. Making things pretty has always been my bag.

This said I have never thought my process of baking to be in any way professional. I have never had any training other than watching my Granny Joyce throwing together a sponge from a recipe ingrained into her psyche, or Nigella sexily spooning glossy globs of batter into shiny golden cases. This has all changed now. I have a new found caking confidence, I feel I can take on those more exotic recipes whose many many steps used to make me recoil in fear. This confidence is all due to the lovely glossy lady shown in the photo below... sorry for the awful quality.

KitchenAid

Meet Dita, my newly acquired KitchenAid mixer. She's gorgeous yes? I feel I can write about her on a food blog much more easily than I can talk about her in person. There is only a small section of the world that can comprehend and understand spending £350 on a mixer, and that small section does not include a lot of my friends and colleagues. Pete only gets it because of the sheer amount of times I have ranted at him about how amazing they are and how I've wanted one since I was nine years old (yet again, Nigella's fault). But now his ears and my vocal chords may rest as she inhabits our kitchen, glinting away on the worktop and making my life a hell of a lot easier.

And so here is the first recipe I tried out with her, originally from Southern Living. I know salted caramel may sound a little scary to some, but just think of peanut butter cups - the slight salty edge offsets the sweetness of the chocolate perfectly.

Chocolate Salted Caramel Cupcake - The Inky Kitchen

Chocolate Salted Caramel Cupcakes
Adapted from Southern Living
Makes around 36 regular sized cupcakes

Cupcake Ingredients
115g (half pat) butter, softened
100g full fat cream cheese, softened
285g caster sugar
165g packed dark brown sugar
4 large eggs
1 teaspoon vanilla extract
375g plain flour
1 tsp baking powder
1/2 tsp baking soda
1/2 tsp salt
200ml sour cream

Ganache Ingredients
200g dark chocolate, chopped
60ml plus 2 tbsp whipping cream

Salted Caramel Buttercream Ingredients
115g (half pat) butter, softened
75g full fat cream cheese, softened
2 teaspoons vanilla extract
1/4 tsp sea salt
400g icing sugar
3 tbsp plus 1 tbsp milk
20 caramel toffees

Garnishes
Sea salt flakes
Caramel toffees, chopped
A little extra dark chocolate, for drizzling


Cupcakes Method
Preheat oven to 180 C /350 F.

Mix butter and cream cheese until well combined and creamy, then beat in the sugars until light and fluffy (around 2-3 minutes). Add eggs, one at a time, mixing well after each and then add the vanilla extract.

Combine flour, baking powder, baking soda and salt in a separate bowl and gradually add to the butter and sugar mixture alternating with the sour cream, beating well after each addition and then for a further 3 minutes. Spoon the batter into the cupcake liners filling each to around 2/3 full.

Bake for 22-25 minutes or until a toothpick inserted into the middle of the cake comes out clean with no liquid batter attached. Let cool completely.

Ganache Method
Put the chopped chocolate and 60ml of whipping cream into a microwavable bowl and microwave on high for 30 seconds. Remove and stir, then cook for a further 30 seconds. Remove from the microwave, add the further 2 tbsp cream and whisk until it slightly thickens. Dip the tops of the cupcakes in the ganache and let stand for at least 30 minutes to set.

Salted Caramel Buttercream Method
Mix butter, cream cheese, vanilla extract and salt until creamy and well combined. Gradually add the icing sugar alternating with the 3tbsp of milk until smooth.

Place the caramel toffees and further 1tbsp milk in a microwavable bowl and microwave on high for 30 seconds, remove and stir, heat for a further 30 seconds. Remove from microwave and allow to cool for 2-3 minutes before adding to the buttercream and mixing until silky smooth.

Pipe or spread onto the cupcakes and then top with a sprinkling of sea salt flakes and chopped toffees and a drizzle of dark chocolate.

Chocolate Salted Caramel Cupcake - The Inky Kitchen

Notes
I didn't think the actual cake recipe used here was all that good. They were quite dry despite the use of sour cream which usually moistens cakes up, and I felt they had a too pronounced eggy flavour that I wasn't keen on. Next time I think I'll use Ina Garten's chocolate cupcakes or my secret mudcake recipe to knock up the cocoa factor a notch.

I used Maldon salt which I crushed up a little in my pestle and mortar as it has a lovely rounded flavour that I thought would work perfectly with the sweet caramel toffees. Maldon salt is available in all major supermarkets and comes in a little green and white box, if you can't find it any good quality sea salt will do.

Irish butter toffees are my favourite and so were the ones I used. It is basically any chewy butter toffee that you need so that they melt, not a hard one like Werther's Original.

Try your hardest not to open the oven door until the minimum cooking time has passed, this will stop any heat escaping which could make the cupcakes sink.

Chocolate Salted Caramel Cupcake - The Inky Kitchen

As I had some caramel buttercream left over and needed to make a cake for an afternoon tea session with my lovely friend Polly, I added some crunchy peanut butter to it along with a little additional milk to loosen the mix and used it to sandwich together the layers of a chocolate cake which I then covered in chocolate fudge frosting. It went down a storm, so I suggest you do the same if you have any spare!!!